Basic electronics wiring
Here is a brief description of the basic wiring of the tank electronics. I'm glad to see that other people are getting into building and expanding the ranks of us modelers.
1) Selection of suitable components
If you do not have a transmitter that allows channel mixing, you must purchase a new one.
My recommendation is the FrSky brand with OpenTX firmware. Here you then have complete freedom to program the outputs. Of course other brands will also suit, the choice is yours.
Choose brushed motor, size 540. The number of revolutions is related to the number of threads, the fewer the threads, the more revolutions. Refer to the motor description from the dealer for the speed. For tanks, motors with speeds between 14k - 23k at 7.2V will be suitable, or a slower 55T for belt drive transmissions - always refer to the tank manual. If the motor has no connectors, you can solder it directly to the controller wires.
Use any controller for DC (brush) motors with a current of at least 40 A. It must be capable of forward-reverse mode. Be careful here, some have the maximum reverse speed set at 50%. You must then change this to 100%. Another pitfall is the SBEC (switching power supply for electronics). It has to match all the components you plug into the tank - servos, receiver, etc. If the voltage is higher, you have to use another power supply (ideally a four-cell NiMh 2000 mA), disconnect the red wire of the connector that goes from the controller to the receiver (it's the middle one), and do this for both controllers! If the SBEC voltage is OK (typically 5.6V), you can power the electronics through this output. For the second regulator, however, you must disconnect the red wire in any case, the switching supplies must not be mixed!
Select the drive batteries according to the motor and controller. Most likely it will be a 7.2V, i.e. dual cell Li-Pol, capacity at your discretion. I recommend between 2 and 5 Ah. The battery connector must be the same type as the controller and charger. The most commonly used connector is XT60. It is a good idea to use 2 batteries, one for each controller. You can, of course, connect the inputs of the controllers and use only one battery.
Engine cooling is advisable to use. A passive cooler will do, but a 50x50x15 PC fan at 12V for each motor is better. The power supply can then be a three-cell LiPol 1800 mA or more.
Purchase servos as recommended in the manual - standard size (42x20 mm), power supply according to SBEC controller or power supply used. Usually it is 5V, 6V, or 7,2V.
The battery charger is an important piece of equipment. If you plan to charge more often, I recommend a better one. It should be able to handle NiCd, NiMh, Li-Ion and Li-Pol cells. Make sure you have the right connectors so you can connect the batteries.
2) Basic wiring - description
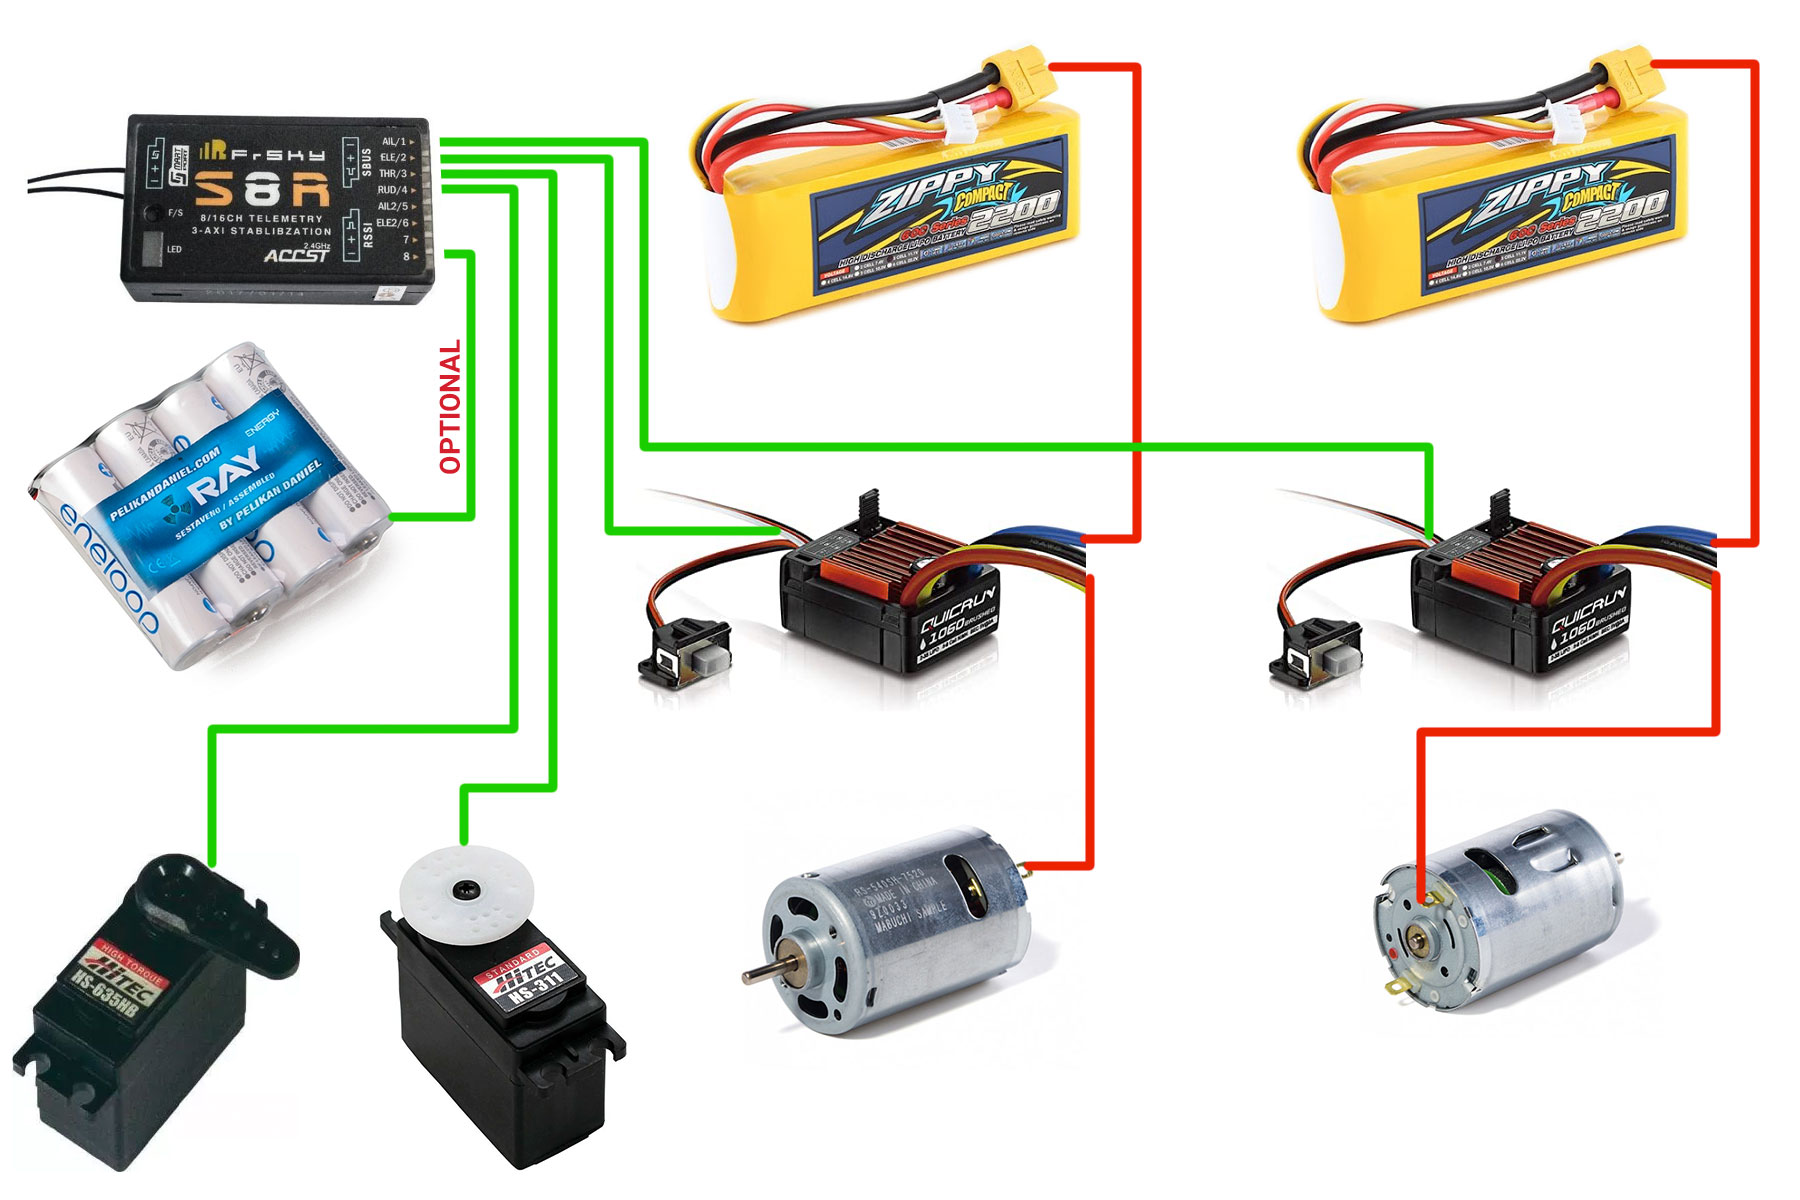
Connect the motors to the controllers - since they are mirrored, connect one in reverse (+ to - and - to +). This will achieve rotation in the same direction.
Connect the servo connectors of the controllers to the receiver, to outputs 1 and 2 (or depending on your RC kit).
If you are using separate power supplies for the receiver and servos, disconnect the middle red wire from the servo connectors on both ESCs.
If you are using the BEC output to power the electronics, disconnect the middle red wire at only one of the ESCs. The outputs from the BECs must not be merged or the electronics may burn out.
Connect the turret rotation servo (modified for infinite operation) to channel 3.
Connect the batteries to the controllers, turn on the transmitter, and switch the controllers to ON. If you use a separate power supply for the electronics, turn that on first.
3) Wiring diagram

I hope that this brief guide has helped you in your basic orientation. Unfortunately it is not in my power to help everyone, there are many variations of electronics and their wiring. So please try FB, discussion servers, and well known modelers first. Thank you and have fun building and riding tanks.